DIY Coconut Chips: Unlock Healthy, Flavorful Snacks & Toppings
Imagine a snack that’s not only incredibly delicious but also aligns perfectly with your healthy lifestyle goals, whether you’re following a keto, paleo, gluten-free, or low-carb diet. Now, imagine creating this snack from scratch in your own kitchen, customizing every aspect to your taste. This dream is a reality with homemade coconut chips!
Learning how to make coconut flakes coconut chips at home is a culinary superpower. These versatile morsels, also known as unsweetened coconut flakes or toasted coconut flakes (depending on their final preparation), can elevate everything from your morning oatmeal to exotic curries, or simply stand alone as a satisfying crunchy snack. Forget the expensive store-bought versions that often come with added sugars and preservatives; with a mature coconut and a few simple tools, you hold the key to an unlimited supply of healthy, flavorful, and customizable coconut goodness.
Why DIY Coconut Chips Are a Game Changer for Healthy Snacking
The allure of homemade coconut chips goes far beyond just cost savings. It's about taking control of your ingredients, maximizing freshness, and unlocking a level of versatility that packaged options simply can't match. Here’s why mastering how to make coconut flakes coconut chips is a true game-changer:
- Unrivaled Customization: From perfectly plain and unsweetened to sweet, savory, or spicy, homemade chips can be flavored exactly how you like them. Think sweet chili, warm cinnamon, or a simple touch of sea salt. This allows you to create unique snacks that cater to specific cravings.
- Health Benefits Galore: Mature coconut is naturally low-carb, gluten-free, nut-free, keto-friendly, grain-free, and paleo-approved. When you make them yourself, you avoid the hidden sugars, unhealthy oils, and artificial additives often found in commercial products. You get pure, wholesome coconut goodness, rich in healthy fats and fiber.
- Ultimate Versatility: These aren't just for snacking! Use your homemade chips as a delightful topping for yogurt, smoothie bowls, salads, stir-fries, and even baked goods. They add a fantastic textural contrast and tropical flavor to almost any dish. For specific applications like baking, you might prefer Steps to Perfect Toasted Coconut Flakes: Keto, Paleo, Gluten-Free, which enhances their flavor even further.
- Economic and Sustainable: Buying whole coconuts can often be more cost-effective than repeatedly purchasing small bags of coconut chips. Plus, you get to utilize the coconut water, making the process even more rewarding.
Whether you’re aiming for a guilt-free snack or a unique culinary ingredient, homemade coconut chips are a pantry staple you'll wonder how you ever lived without.
Essential Tools and Ingredients for Your Coconut Chip Adventure
The beauty of making your own coconut chips lies in the simplicity of the process and the minimal equipment required. Before you dive in, gather these essentials:
The Star Ingredient: A Mature Coconut
The foundation of your delicious chips is a good quality mature coconut. Here’s how to pick one:
- Shake Test: Hold the coconut to your ear and shake it vigorously. You should hear plenty of sloshing liquid inside. This indicates freshness and a good amount of coconut water.
- Visual Inspection: Look for a coconut that is heavy for its size and free from cracks, mold, or soft spots. The "eyes" (three indentations at one end) should be firm and dry.
Your DIY Toolkit:
- Hammer or Mallet: Essential for cracking open the hard shell. A rubber mallet is ideal, but a standard hammer works just fine.
- Sturdy Bowl: To catch the precious coconut water when you crack it open.
- Butter Knife or Coconut Tool: For separating the meat from the shell. A dedicated coconut tool makes this easier, but a regular butter knife is perfectly adequate.
- Vegetable Peeler: Crucial for removing the brown skin from the coconut meat and for peeling the white meat into thin flakes or chips.
- Mandolin (Optional but Recommended): For achieving consistently thin and uniform chips, a mandolin is an excellent investment. Always use a safety guard when using a mandolin.
- Baking Sheet(s): For spreading your coconut chips in a single layer for drying or baking.
- Oven or Dehydrator: Your primary tool for transforming the fresh coconut flakes into crispy chips.
- Airtight Container: For storing your finished chips.
With these items ready, you're well-equipped to begin your journey to homemade coconut chip perfection!
The Step-by-Step Guide to Crafting Perfect Coconut Chips
Making homemade coconut flakes or chips is a rewarding process, and surprisingly straightforward. Here’s a detailed breakdown of each step:
Step 1: Cracking Open Your Coconut
This can seem daunting, but it's easier than you think. The goal is to crack the coconut without shattering the meat inside.
- Prepare Your Workspace: Place a kitchen towel or a non-slip mat under your coconut to prevent it from sliding. Hold the coconut firmly in one hand, positioning it over a bowl to catch the water.
- The Hammer Method: Identify the "equator" or middle line of the coconut. Using a hammer or mallet, hit firmly along this line, rotating the coconut slightly after each strike. You don't need excessive force; consistent, rhythmic taps will eventually cause the coconut to crack neatly in half.
- The Freezer Hack (Pro Tip): For an even easier crack, place the entire coconut in the freezer overnight (8-12 hours). The expansion and contraction can make the shell brittle, often allowing it to crack open much more easily with a few taps, sometimes even causing the meat to separate from the shell itself! After freezing, follow the hammer method.
- Drain the Water: Once cracked, drain the coconut water into your bowl. This refreshing, electrolyte-rich liquid is delicious to drink on its own or can be used in smoothies.
Step 2: Extracting the Pristine Coconut Meat
Now that your coconut is open, it’s time to retrieve the valuable meat.
- The Butter Knife Method: Take one half of the cracked coconut. Carefully slide a butter knife between the white coconut meat and the hard outer shell. Wiggle the knife gently, working your way around the circumference. With a bit of patience, the meat will start to detach. Larger pieces are ideal for making chips, but don't worry if some bits break off – they're still perfectly usable!
- Specialized Tools: If you plan to make coconut chips frequently, a specialized coconut meat removal tool can make this step quicker and easier.
Step 3: Peeling and Shaping Your Chips
This step transforms the raw coconut meat into beautiful, consistent flakes or chips.
- Peel the Brown Skin: The coconut meat will have a thin brown skin on one side. While edible, it can be a bit tougher and is usually removed for aesthetic and textural reasons when making chips. Use a vegetable peeler to carefully peel away this brown layer from the white coconut meat. Don't discard the brown peel; it can be added to smoothies or oatmeal for extra fiber and nutrients.
- Rinse and Dry: Briefly rinse the peeled white coconut meat under cold water and pat it dry with a clean kitchen towel.
- Shape Your Chips:
- Vegetable Peeler: Hold a piece of coconut meat firmly and, using a vegetable peeler, shave thin, wide strips directly from the white meat. Aim for a consistent thickness.
- Mandolin: For uniformly thin chips, a mandolin is your best friend. Set it to a thin slice setting (e.g., 1-2mm) and carefully slice the coconut meat. Always use the safety guard to protect your fingers. Thinner chips will be crispier and dry faster.
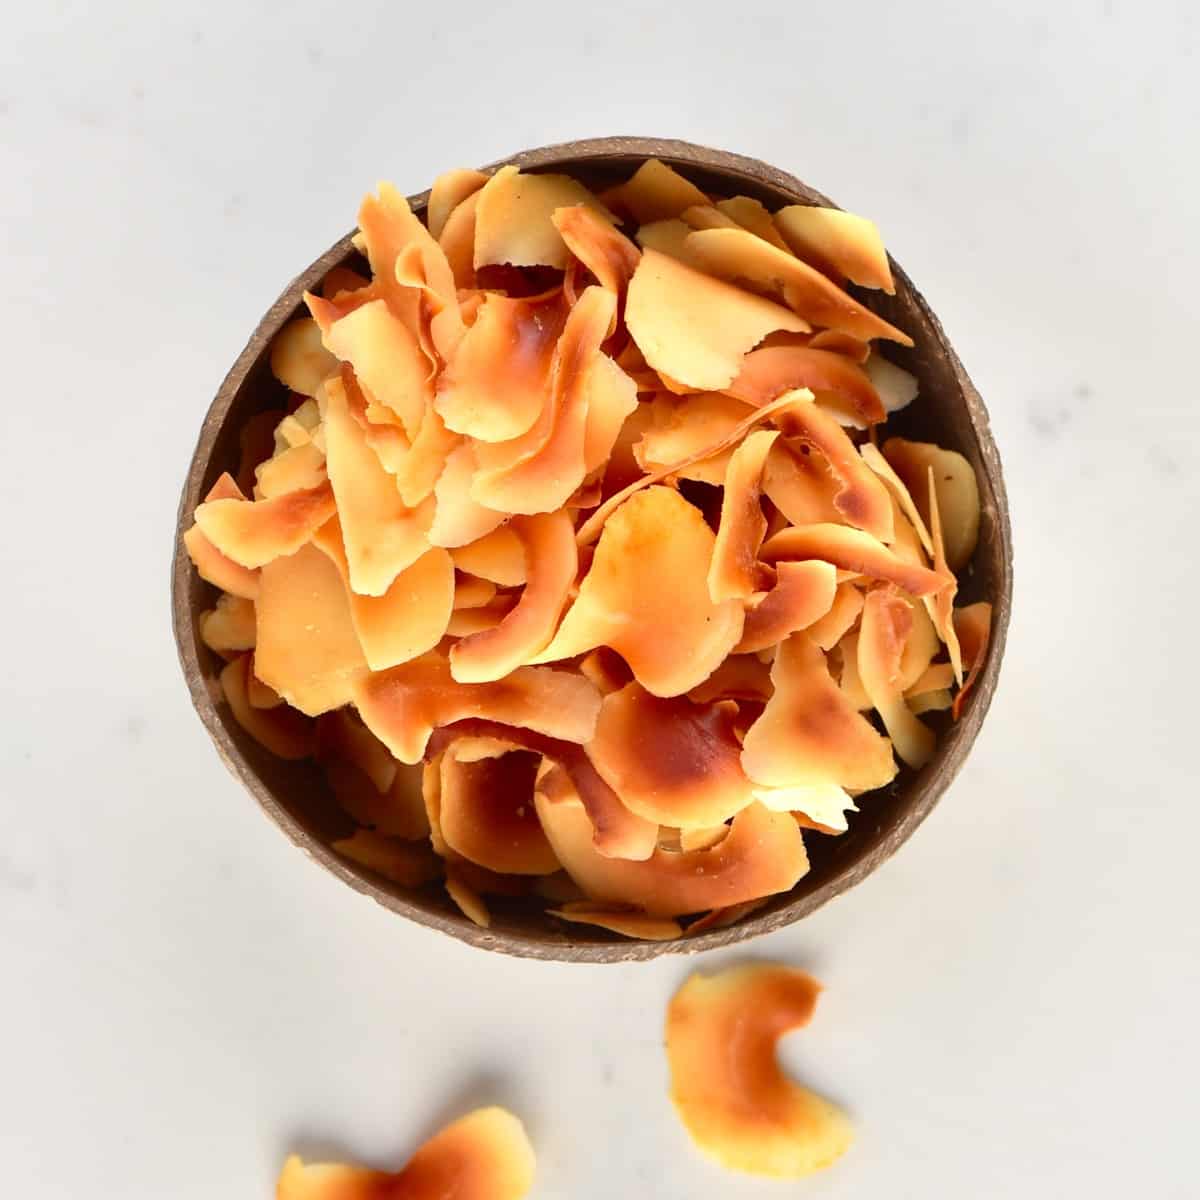
Step 4: Drying/Baking for Crispy Perfection
This is where the magic happens, turning soft flakes into crunchy chips. The key is low heat and patience.
- Prepare for Drying: Spread your coconut chips in a single layer on a large baking sheet. Overlapping chips will steam instead of crisp, so ensure good air circulation.
- Oven Method (for drying/baking):
- Preheat your oven to a low temperature, typically 60ºC/140ºF. This low heat helps to dehydrate the coconut without toasting it too quickly, preserving its natural color if you want unsweetened coconut flakes.
- Bake for approximately 1 hour, but baking times can vary significantly based on your oven and chip thickness.
- Monitor Closely: Check on your chips after 30 minutes. Give the baking sheet a gentle shake to flip them around. Return to the oven and check every 10-15 minutes thereafter. You want them dry and crisp, not browned or burnt, unless you are deliberately making toasted coconut.
- Remove from oven when they are firm, dry, and slightly pliable but snap when cooled. They will crisp up further as they cool.
- Dehydrator Method (for raw chips):
- Spread chips on dehydrator trays in a single layer.
- Set your dehydrator to a low temperature, around 40ºC/105ºF. This is ideal for preserving the "raw" qualities and nutrients of the coconut.
- Dehydrate for about 4-6 hours, or longer, until completely dry and crispy. The exact time depends on the thickness of your chips and your dehydrator model.
- Cool Completely: Regardless of the method, allow the coconut chips to cool completely on the baking sheet or dehydrator trays before handling or storing. They become much crisper as they cool.
For those specifically looking to enhance flavor with a golden crisp, creating toasted coconut flakes involves slightly higher temperatures and constant vigilance to achieve that perfect golden-brown hue without burning.
Customization & Storage: Elevating Your Homemade Chips
Once you’ve mastered the basic technique, the real fun begins with customizing your DIY coconut chips!
Flavor Innovations:
- Sweet & Simple: Before drying, lightly toss your flakes with a sprinkle of erythritol or monk fruit sweetener (for keto/paleo) and a pinch of cinnamon or vanilla extract.
- Savory & Spicy: Experiment with a light dusting of sea salt, smoked paprika, chili powder, or a dash of nutritional yeast for a cheesy flavor. A squeeze of lime juice before drying adds a zesty kick. Inspired by the variety found in places like Thailand, you can even try a hint of sweet chili powder!
- Chocolatey Indulgence: After the chips are completely dry and cooled, you can drizzle them with melted dark chocolate (sugar-free for keto) and let them set on parchment paper.
The beauty of making your own is the endless possibilities to match your mood or meal. For more ideas on how these versatile chips can enhance your cooking and snacking, check out our guide on Make Homemade Coconut Flakes: Easy Steps for Versatile Chips.
Storage for Lasting Freshness:
Proper storage is crucial to maintain the crispness and flavor of your homemade coconut chips.
- Airtight Container: Once completely cooled, transfer your chips to an airtight container. A glass jar with a tight-fitting lid is ideal.
- Room Temperature: Store them at room temperature in a cool, dark pantry. They will typically stay fresh and crispy for 2-3 weeks.
- Refrigeration: For extended freshness, especially in humid climates, you can store them in the refrigerator for up to a month.
- Freezing: For long-term storage (several months), place them in a freezer-safe bag or container. They can be enjoyed directly from the freezer or allowed to come to room temperature.
Ensure no moisture gets into the container, as this will make them soft and reduce their shelf life.
Conclusion
You now have all the knowledge and inspiration to dive into the rewarding world of making your own DIY coconut chips. From cracking the coconut to drying them to crispy perfection, this comprehensive guide has walked you through every step. Not only will you save money and control exactly what goes into your snacks, but you'll also unlock an incredible range of healthy, delicious, and versatile options for both snacking and culinary adventures. So grab a mature coconut, channel your inner artisan, and prepare to elevate your healthy eating with these fantastic homemade coconut flakes!
